Tuesday, October 9, 2012

Gear Review: SE Electronics SE2200a Condenser Microphone

It's always an exciting thing to review a piece of gear hear at The Short Term Melody Blog. Exciting because a new gear review means a new piece of gear! There is nothing as exciting as getting more toys.

The SE Electronics SE2200a has received a fair amount of attention in the past, especially for it's price to performance ratio (as if you can actually break down a microphone's performance into a numerical value), and my experience with the microphone has not been any different. 
The SE Electronics SE2200a


Impressions
The SE2200a is quite an attractive microphone, covered in a brushed aluminum/champagne finish, adorned only by a small "SE" logo in red and inset "SE2200a" on the business end of the mic, lending the mic a clean and classy appearance. The microphone itself is of substantial weight, especially considering it being a solid state microphone; heavier than that of competitive microphones in it's class (AT4040, Rode NT1), giving a solid feel. The microphone too is supplied with a similarly finished shock mount which acts as a microphone stand adaptor. The combination of microphone and shock mount looks great on the mic stand; any engineer can present the microphone with confidence to any discerning vocalist or voice-over actor. 

Features
Now microphones are simple machines by design, but the SE2200a has some great bells and whistles, despite the lower price point. First off was the included shock mount, which screws into the bottom of the microphone securely. The mic also has two switches, one a -10dB pad for using the microphone on loud sources (to keep the microphone's internal FET preamplifier from over loading), and a high pass filter with a gentle -12dB slope starting at 80Hz and extending below. Both of these features make the microphone more versatile in recording situations.

Most importantly for me is the inclusion of an output transformer. Many of the classic condenser microphones had output transformers, such as the Neumann U87 (solid state) and the AKG C12 (valve). Though transformer-less output microphones oftentimes boast better signal-to-noise and lower total harmonic distortion (THD) than that of a transformer-output microphone, I've always felt that an output transformer lends a bit more depth to the overall sonic image. The SE2200a is a solid state condenser microphone, utilizing a FET preamplifier circuit and an output transformer. Lastly, the SE2200a is a cardioid only design, so those searching for a multi-pattern condenser will have to search elsewhere.

In Practice...
I bought this particular mic exclusively for vocal use, so that is where I used it right away. I tested it against the Audio Techinca AT2020 ($100 street), though the comparison isn't completely fair, due to differences in diaphragm size and price point. The AT2020 (review coming soon) is a great budget general-purpose cardioid-only condenser microphone which I have been able to use with great results on both instruments and vocals, so I though the comparison could be useful.

In comparison to the AT2020, the SE2200a yielded a deeper soundstage; my voice sounded  more realistic, though the sound of the SE2200 was more flattering than neutral. The overall sound was warm, with a noticeable though not distracting bump centered around 250Hz that gradually tapered on either side. This would probably cause an issue with proximity effect, but the onboard high pass filter was useful for cutting down on the mud while still preserving the weight of the sound. The microphone also had a slight hump in the highs around 12kHz, lending airiness to the sound without harshness. This high end emphasis however should be minded, for singing directly into the microphone without proper distance can create sibilance issues for some singers. This goes as well for proximity effect.

For the particular song I sang to, I found the natural sound of the microphone needed very little mixing, especially when tracked with my ART Pro VLA II tube compressor in line. The vocal remained the center of attention without surging forward too far out of the mix and without taking over the mix completely. The vocal just seemed to find the right place in the mix once it was leveled in relation to the rest of the instruments: just what a good vocal microphone should do.

Just another note: the microphone was also noticeably more sensitive than the AT2020, picking up added room ambience. This can definitely be a good thing when recording in a suitable acoustic environment, but may require some extra treatments, such as a reflection filter or baffles to get the intended result from the vocal.

Conclusion
The SE Electronics SE2200a is definitely a good (maybe even great) microphone, especially considering it's price of around $250 USD. Prices aside, I believe the microphone to be a great vocal performer in general, adding weight and three-dimensionality to both lead and backing vocals, all without taking over the mix. The overall character of the mic was smooth and classic, up front without jumping out at the listener; in my mind, what a good transformer-output FET condenser should sound like. 

Thursday, October 4, 2012

Humming along... or singing along. Roadwaves update.

So "Roadwaves" continues to bump along down the road of recording. From an amplifier meltdown to a whole host of renovations (and utter destruction) that kept me from using my home studio for more than a month, plus snaking around busy work schedules, it's been an interesting summer. But the band still soldiers on.

I've begun work on recording the lead vocals for the album, with so far two songs completed. These songs still await backing vocals, harmonies and such, then mixing before actually being considered "completed," but it feels great to finally be over the massive hump that was recording the instrumentation for the album. Once I started laying down vocal tracks, it started feeling like the finish line is in sight. 

The fun part is that through the whole melee of setback after setback, I was able to procure a new microphone: the SE Electronics SE2200a. I have wanted a microphone that would be dedicated strictly for vocal use for a long time, just so the vocals could have their own distinct sonic signature from the instruments. I took my time researching the multitudes of budget-friendly large diaphragm condenser microphones out there, and felt that the SE2200a, with it's output transformer and 25mm diaphragm size addressed my sonic desires best. 

I won't go into detail about the mic here; an in-depth review will be soon to follow. Without further ado, I am quite pleased with the results. The SE2200 is a very classy, smooth microphone that works well with my voice. Another tool in the box of tricks.

Anyway, that is all for now. It's time to lay down more vocals. 

Tuesday, June 26, 2012

New Speakers!

When your amp isn't making a joyful noise and waking up the neighbors or shattering windows, it's not a time to sulk. There are other things that you could be doing, like sprucing up your sound with a new set of speakers.
The cab with Eminence designed Fender Speakers. Recording session, March 2012.


I use a home-built open back birch plywood cabinet for the business end of my amplifier setup. The cab was bought second hand loaded with two 12 inch Eminence designed Fender speakers, with 50 watts power handling each. They were satisfactory speakers, and sounded acceptable at lower volumes, though at higher performance volumes sounded spiky and uneven. Needless to say, I was never too happy with their sound. 


Upon removing them from the cab, I noticed what looked like two significant tears in both speakers, that were haphazardly repaired with a putty of some sort. I guess now seeing the ramshackle way they were patched, no wonder things sounded as odd as they did. 


So I took the plunge into the shallow end of the pool and bought some relatively inexpensive speakers made by Weber VST, the Ceramic Signature 12B. As stated on the website the Ceramic 12B would be an economic replacement for the Jensen C12N, which greatly interested me since the Jensen C12N is what was commonly used in the blackface Fender Twin amplifier. You may be thinking, "dude, you play a Marshall clone; why not use Celestion Greenbacks like the old Marshall cabs?" Yes, that would be the clear way to go, but I'm kinda a weirdo. There is something about the Marshall-meets-Fender thing that really interests me. So I ran with it. 


These speakers when shipped weighed impressively more than the lightweight Fender speakers and installed effortlessly into the speaker cabinet. Weber VST have a reputation for great sounding, quality speakers, and have been long used as a replacement or even upgrade for vintage Fender guitar amplifiers. 
Cab loaded with Weber Ceramic 12Bs.
Speakers are sometimes the unsung hero of the amplifier setup. Everyone talks about the head, what tubes your packing, but speakers, the different Celestion, Jensen, Eminence, Oxford, etc. models offered, wattage rating, speaker efficiency, alnico versus ceramic magnets; these discussions don't come up as much. And I will admit, the idea of different construction methods of speakers are quite complex and I don't understand them all too well, but upon listening to different models, even made by the same manufacturer, sure exerts a great deal of influence on ultimately how your amplifier will sound. Distortion character, frequency content, dynamic range, touch, and even perceived loudness of your amplifier is ultimately governed by the speakers, how many, and in what cabinet.


Needless to say, I can't wait to get the amplifier finished, so I can start rocking on these bad-boys.

It's Alive! The Amp Rebuild Part 3.

Open chassis ready for a line check.
Outlet for the lightbulb series limiter in top left corner. 
After soldering the last few connections to the output tube plates, and connecting the various B+ voltages to their selected points, it was time to power up. Not a full power up, but a graduated one that would start with a 75 watt lightbulb in series with the amplifier to prevent destroying any of the precious components: transformers, tubes, capacitors, or staring a fire.
For the first power up, I would do so without any tubes installed, just to make sure. 


If you are curious about putting a 75 watt bulb in series for debugging, read my previous blog post "Amp Rebuild, Part One." 


With the 75 watt bulb in place, AC cord in the power outlet, and safety goggles on, I flipped up the mains switch into the ON position. To my relief, no sparks, no fire, no snap, crackle or pop. With the necessary precaution, I measured the voltages across the primary and secondary winding with the voltmeter, as well as the B+ voltages, with everything checking out just fine, if not slightly under voltage due to the loading created by the 75 watt bulb. It is important to be wearing rubber shoes in order to prevent your body from being the path to ground, and electrocution . 


I then turned the amp off. Since there are no tubes installing in the circuit, the smoothing filter capacitors do no discharge, which means they can be storing up to 450 volts in some cases. With one hand in my back pocket, I connected a short clip lead to the chassis and proceeded very cautiously to touch the positive (+) terminals of each of the polarized capacitors in the circuit. Remember, it is very important to be wearing rubber shoes in order to prevent your body from being the path to ground, resulting in electrocution. Be advised, when discharging polarized capacitors, large sparks are likely to leap from the positive terminals to your clip lead as the capacitors ground out their charge. 


Still with the 75 watt bulb installed, I repeated the power up, except this time with tubes. Again with the precaution of wearing rubber shoes and keeping one hand in my back pocket and other holding the voltmeter test probe (making sure not to touch any B+ voltages and ground points simultaneously, which would cause a short), took all the measurements again. This time the voltages were even slightly lower, to be expected with the tubes installed (drawing more current, lowering the voltages). Again no sparks or pops and voltages to be expected with a 75 watt bulb in series.


I then repeated the same test with a 150 watt bulb in series, then full line current/voltage, and everything looked great on paper. The true test came when I plugged my Stratocaster in and turned up the volume controls just to see if I got any hum from the single coil pickups. Nothing. Not a peep; the amp was dead silent. Problems. Hopefully not serious ones, but problems nonetheless. 


It's alive, but it's still not talking. The saga continues. 

Friday, June 22, 2012

Rogue waves in the Roadwaves.

Thus far, "Roadwaves" has been a interesting project. Both as a band and personally as a recording engineer, I had never experienced anything so rigorous, challenging, strenuous, and as rewarding as the recording of this album. Despite the numerous setbacks, both scheduling, performance and equipment-wise, it has been a great experience and I haven't learned so much in such a short amount of time about musicianship, recording engineering, producing, and I guess, just being a human being. 


Since my fairly documented amplifier failure a couple of weeks ago, the band and me have decided to go forward with the project recording Alec's bass parts as my amplifier awaits completion. We have attempted to record some bass over top the completed drum tracks, but weren't all too satisfied with the resultant sounds. So this second time around we came up with some pretty cool, simple solutions to some age-old questions we had recording bass.


DI versus AMP. Why not both?


Bass guitar (and other low-frequency dominated instruments) do not have as much directionality in a stereo field as instruments that include higher frequency components, such as guitar, snare drum, cymbals, etc. Since about the mid to late 1960's, it has been a common practice to record the electric bass guitar directly through means of a impedance balancing transformer, more commonly known as a "direct inject" box, or DI. This gives a clean, electronic representation of the bass guitar sound as what come straight from the bass guitar's pickups (well, routed through the volume and tone controls on the instrument too). The DI does away with the anomalies associated with bass amplification, speakers, microphones, the environment of the recording space, and the distance the microphone is placed from a speakers, giving a drier, up front, and direct sound, which can sound sterile on it's own. 


Another practice is to mike the bass amplifier with a quality microphone; a Sennheiser MD421, AKG D112, Electrovoice RE20 or something of the like. This normally yields a "live, in the room" type sound, which is typically more natural and fuller, though can be hyped in certain frequencies or suffer from distortion as a result of the amplifier or speakers, or phase issues because of distance of the microphone from the speakers. Some engineers however swear by the amp and microphone technique, since it is most true to form when seeing a band perform live.


With modern digital (especially DAW based) recording platforms, higher track counts, almost unlimited track counts are possible, which allows the engineer to record multiple signals dedicated to a single instrument. This can be very useful for bass, allowing the engineer to record both direct and miked bass sounds, and blend them to taste in final mix down. With recording both, it is very, VERY important to observe phase relationship between the direct and miked signals. You should avoid as much as possible phase cancellation and/or phase reinforcement which may cause uneven frequency response of the bass, to avoid a week or otherwise boomy sounding bass sound. 


THE ROGUE WAVE.


So Alec and I settled on a scheme where the direct signal would provide a clean bass sound that would represent the full frequency response of his Fender Jazz Bass, while the amplifier would provide a more focused, mid range sound. The amp would be driven a little harder through means of a Boss Super Overdrive or EH Big Muff in order to add some harmonics to give the bass a more pronounced sound in the mix. The challenge was to record a clean DI signal that would be unaffected by the distortion pedals that were on the front end of the bass amp.


Since I didn't have an instrument-level signal splitter box (or any type of splitter for that matter) we used a somewhat unorthodox, if not "incorrect" method. The signal would leave the Jazz Bass, into a DI box, through an XLR cable to my Yamaha MG12 mixer, of which would be then (through one side of the stereo buss) routed through an ART tube compressor then to the A/D conversion. Part of that bass signal would be tapped from the mixer channel via an AUX send, through another instrument cable to a distortion pedal, then to the bass amp. Thankfully this particular amp, a cheap 30W Carlo Robelli bass amp with a single 10" speaker, had an active pickup input. Though line level is not quite the same as a bass with active pickups, the signal level would be closer active level than passive instrument levels. From there, the bass amp was close miked with a Sennheiser MD421 in close proximity with careful attention to phase relationship with the DI signal. The whole setup was then covered in a heavy packing blanket in order to minimize room reflections on the miked bass amp sound.


Note: using a mixer AUX to send an instrument signal is not the recommended way to go when multing a signal to used as both a direct signal and one to be the input signal for an amplifier. A re-amp unit would be much better at doing this, because of impedance and signal level differences.  In our situation, it was all we had, and honestly, sounded pretty darn good for how primitive the method is. 


Oh yeah, here are some pics of the session. I will post the pictures of the DI/mic signal chain in the near future. 
Alec and the Jazz Bass.

Alec and the invisible engineer... I guess I can't take photos and be in the shot at the same time.

My modest, yet effective recording setup. Yamaha MG12, ART VLA compressor, M-Audio Fast Track 8R, and Mac Book Pro armed with Pro Tools 8

Monday, June 18, 2012

The Amp Rebuild, Part Two.


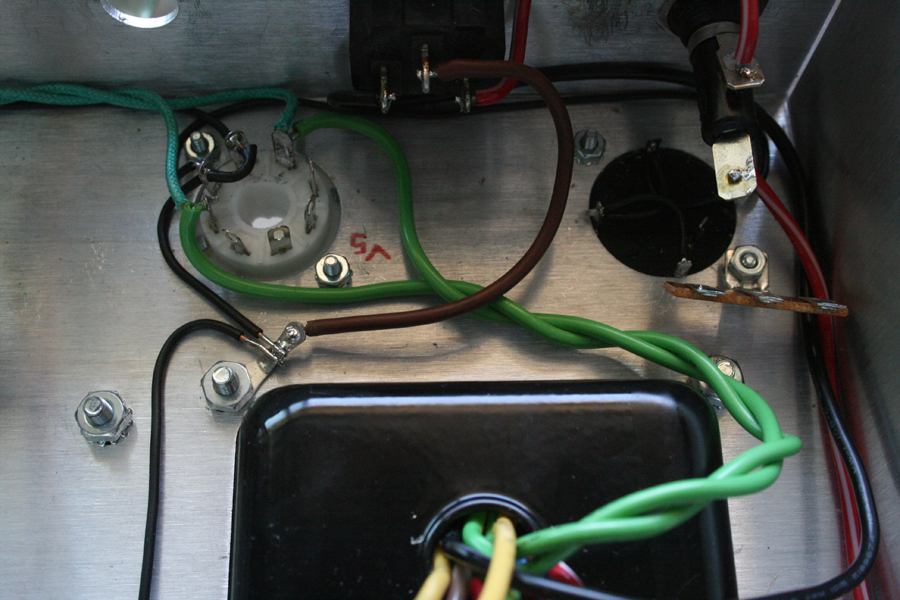
After almost two weeks wait, the new transformer finally came from the good folks over at Weber VST all the way in Indiana. I promptly got the thing mounted in the chassis and started laying down the filament wires to the tubes and the connected the wires leading to the primary winding (the 120V side of things). 

Just to make sure my power transformer doesn't short out again, I connected the power plug to the the 125V winding, since my wall outlet read 121V. 
Brand spankin new power transformer.
6.3V filament taps to the power tube socket. These wires
are wound to and ran close to the chassis to
minimize noise from entering the signal path.
Filament wires to the preamp tubes. Pins 4 and 5 are
connected in series to create the 12.6V necessary
to run the 12AX7 preamp tube.
Up next: mounting and connecting the main circuit board and rectifier circuit.

Friday, June 15, 2012

The Amp Rebuild, Part One.

In my last entry, I talked about how my Marshall hodge-podge clone, that I lovingly named "Katie" died mid recording session, and how I am now fully vested in nursing her back to health again. I'm not too sure how many guitar players get to see (or really are interested in seeing) the innards of the box that makes all their noise possible, but I decided it would be a cool thing to document the deconstruction and reconstruction of my personal noise making box. 


The Lightbulb Limiter
Fig. 1: The Lightbulb Limiter.
Before pulling the amp completely apart, I had to run some tests with live electricity running through the amp just to see what had gone wrong. I had suspected some part(s) of the circuit had shorted, causing the mains fuse to blow, cutting off electricity to the entire amp. In order to run diagnostics on the amp, I installed a new fuse and then built a "lightbulb limiter." This crude device limits current by putting a lightbulb in series with the amplifier, so all electricity flows through the lightbulb before hitting the amplifier. 

If you are interested, the lightbulb limiter works on the wattage principle:

Watts = Voltage x Current

where if you take an X watt lightbulb divided 120 volt line voltage coming off the wall will equal the total amperes of current available to whatever device you have plugged in downstream of the lightbulb (in series).

For example... 150 watt bulb / 120 volts = 1.25 amps 

For the actual diagnostic I used a 75W bulb, limiting the current to 0.625A, well below the value of the mains fuse, so the fuse would no blow if there were any shorts.

I constructed the lightbulb limiter from:
-plastic wall lamp holder
-2 gang utility box
-dual wall outlet
-single three-way light switch 
-plastic outlet/switch wall cover panel
-tool replacement power cable
-75 watt lightbulb
-14 AWG stranded wire

If any of you would like a schematic and/or layout of the limiter, just email me. 

Trouble, trouble, trouble. 

With the 75 watt bulb in place I plugged the amp into the limiter outlet and flipped the on switch on the limiter, then on the amp (with the amp still on standby) and found a problem right away. If nothing is wrong with the amp, the light should no glow at full brightness, indicating that the amp is not drawing excessive current, but the light lit up to full brightness, even with the amp on standby. This indicates a short on the primary winding. The primary of any power transformer should read around 115 to 120 volts in the States, but only read 2.5 volts on the multimeter. The short in the primary probably caused a huge current spike to occur through the rest of the amp, causing some of the damage to smoothing capacitors before the fuse blew.
Fig. 2 Burnt KT66 tube. 
Another issue was the burned tubes. I'm not sure if the power transformer failure caused the tubes to burn, or vice-versa, but somehow I think they are related events. I had heard that power tube failure can sometimes cause a power transformer failure as well. In my amp, this makes perfect sense if the problem originated at the power tubes first, being that I had these in my amp for nearly six years (stupid me!) and I never checked up on them to see if they needed replacing or drifted out of bias. Stupid of me; I will definitely never let that happen again. 

The Cleanup.
Fig. 3: Main circuit board with old cloth wires.
So began the cleanup. I first removed the two circuit boards and their connective wires, then tested each part with a multimeter, marking on the schematic with a highlighter which components were suspect for either damage or otherwise not reading their intended value, reserving the suspect components in a small jewelry organizer. 
Fig. 4: Staying organized.
I eventually had to remove almost everything from the chassis to take out the failed transformer.
Fig. 5: Cleaned up chassis.

Fig. 6: The dead transformer, which had a good run for a time. You did good, kid. You did good. 
Stay tuned for more updates.

Thursday, June 14, 2012

Amps Gone Wild.

I had always dreamed of owning a vintage Marshall, or something that could get me that tone. I loved the sounds of Eric Clapton from "Bluesbreakers" and "Fresh Cream," and Paul Kossoff from Free's eponymous album. I could not afford one, so I ended up teaching myself enough electronics chops to build one.
Paul Kossoff (Free) and his dual Marshall 1959 model 100 watt stacks.
Much too loud for my gigs, but his tone is incredible. 


I started off with a Weber 6m45p amp head kit and modified the circuit as I went along. So what I ended up with was roughly a cross between the Marshall 50 watt Lead model 1987 and the later 2204, possibly an amp that never really existed: dual KT66 output tubes (instead of the usual EL34), 12AT7 phase inverter (30% less gain than the usual 12AX7),  with some capacitor changes that were more similar to the mid '70s Marshal Master Volume model 2204, yielding a somewhat brighter sound just without the increased gain, and the all important post phase inverter master volume (PPIMV) that would allow me to dial in any gain level at any volume. I loved the sound of the amp; it was very dynamic and open sounding, with a creamy, smooth breakup that was more akin to the mid 1960's Marshall 1987 than the 2204. When playing a Les Paul, the sound was very similar to Paul Kossoff's tone on "Alright Now," especially when played through a 4x12 cab with Celestion Greenbacks (which I no longer own), but when paired with the Jazzmaster, it was a unique tone all my own. It was great!
Me and the amp at the Golden West College Battle of the Bands, April 2012.
The cab is a home made open back 2x12 with two Fender OEM Eminence speakers
pulled from a Fender Twin.


The amp was fail proof for five years, logging hundreds of hours of shows, recording sessions, and rehearsals. It was all good until three weeks ago when the amp went POOF! in the middle of recording a guitar solo for the Short Term Melody's upcoming album. 


It literally sounded like someone was frying bacon in the middle of the guitar solo, then a quickly diminishing output. Then the smell of burned capacitors (like burning plastic)... OH SHIT was all I thought. After I let the amp cool down I pulled the chassis from the cabinet. Everything looked fairly normal except some of the caps were leaking an oily fluid from them. Upon further examination, the power tubes and the mains fuse had indeed burned out.


So began the journey to get my sick amp back to health again.

Sunday, April 15, 2012

WINNER! Golden West College Battle of the Bands!

It finally happened! We had competed at the local community college battle of the bands on three separate years: 2009, 2010, and again this year. We had always placed second by a one or two point margin, so this year we were prepared. We chose our 5 favorite original songs and put them under a microscope, refining them the best we could for almost a month. It paid off. 


And there you have it! The Short Term Melody, winner of the Golden West College Battle of the Bands. It's not a Grammy, but it sure feels good anyway! 


Posted below are videos of the entire set in order of appearance. Enjoy!


"California Sun"

"Circles"

"M.I.A."

The closer: "So Much / I Can't Be Anybody Else"

Saturday, December 24, 2011

Vids from the Prospector show!

So earlier this week, we played a great show at the Prospector, a local Long Beach bar/venue/restaurant hangout, which was the first public performance of the band since September (see previous post). It was well attended, super loud and super fun. So I wanted to share a couple videos posted by our friend Marko. I hope you enjoy!


"California Sun"

"Circles"

Thursday, December 22, 2011

2 "New" Live at Golden West College Videos

All the way back in September, the band played a great outdoor show at Golden West College's welcome back event. I finally had gotten around to editing down the video... something that I dreaded for my MacBook is rather unfit for the job. But anyway, at the show I set up a static shot from the corner of the stage in hopes no one would knock it over, and thankfully no one did. Not the most interesting angle, but you all can get a glimpse of the show. 


"The Drifter"

Outro solos from "The Tree Still Bleeds"

I had to include the second video for obviously self-gratifying reasons. Alec and I trade 4's to the end; a way for us to pay homage to Steven Stills and Neil Young's dueling solo on live versions of "Down By The River."  Hope you all enjoy the videos!

Tuesday, October 11, 2011

Recording: Tracking Electric Guitar, Part 1 of... many parts.

Recording electric guitar, to me, is one of the most fun and yet one of the most frustrating parts of recording. As far as most frustrating still remains recording the drum set, but we'll talk about that more at another time. 


Today was the first day of electric guitar overdubs for "The Drifter," and I was amped... no pun intended. After allowing both guitar amplifier and compressor to warm up (about an hour), placing the microphone at just the spot where the sweetest sounds seemed to be oozing out the amplifier, the guitar was tuned, and I was ready for a take. One take turned into two, three, four, then five. Before I knew it I was on take fifteen and I still wasn't performing the way I wanted to. I wasn't locked with the drums and just wasn't strumming very precisely. Sloppy, sloppy, sloppy. 


So I come to lesson one in guitar recording:
If it's not happening, step away from the guitar.
My hand was fatiguing fast and I was losing inspiration. Some people work very well plugging away at something until it suddenly works. I on the other hand cannot work this way. I can try only up to a certain point until I become demoralized. So in this case I just put down the guitar, put the amp on standby, and went out for a 15 minute walk. 


Once I came back, my fretting hand was rested and I had a clear enough head to dive headlong back into the recording process. Before I knew it, in less than two hours I had laid down over ten tracks of rhythm and lead/riffing guitar parts. What a difference a positive attitude and a clear head can make. 


So now onto the real purpose of the blog... fun tricks and tips for the electric guitar that I've come across in my little experience as an engineer.


Stereo Width: Using Different Guitars
 
Two Fender classics: Stratocaster (left) and Jazzmaster (right)
Standard rock arrangement usually calls for multiple tracks of guitars, but any popular song arrangement can benefit from multiple guitar tracks. 

I often like to record at least two tracks (two separate takes) of electric guitar playing the same exact thing to give the impression of thickness and substance to a guitar sound. My favorite method is to employ two different guitars with slightly different sonic characters to add a lush, three-dimensional sound. I start with a mellow or dark sounding guitar, which I then balance by recording a bright or chimey guitar. In the case of "The Drifter," I employed first a Fender Jazzmaster (mellow sound) complemented by a Stratocaster (brighter sound). This works too if you contrast humbucker equipped guitars with single coil guitars, or simply by using guitars that are brighter in character (i.e. Danelectro) with guitars that are darker in character (i.e. Gretsch).When panned hard left and right in the mix, the stereo field remains wide despite the similarities in performance and chord changes simply because the sonic character of the two guitars are different. 

Of course, no two guitars are exactly the same, so you can play around with whatever two guitars you have lying around to get the same stereo-widening effect. 

Monday, October 3, 2011

Production begins on "Roadwaves." (New full length album)

A momentous occasion in the world of DIY music... not really saying anyone has been waiting, but production began today for the "Roadwaves" album, the band's debut full length. We did a short session (about 4 hours) of drums, played by Mike, our drummer, which needless to say, did a great job. :)


Just like many bands, instead of going into an established studio, we've decided to record this album ourselves. Armed with my recent BA degree in audio recording (from CSUDH's Digital Media Arts program), a few microphones, a compact mixer for gain and a touch of EQ during tracking, an audio interface and Macbook Pro, it is a modest setup at best, but more than enough to make a great sounding record. And we would rather do it this way, anyway. 


Many will make the argument that recording at home will yield "less that satisfactory" results due to the sonic anomalies that exist in rooms found in a normal house. True, most rooms can adverse recording environments, with environmental noises, standing waves, room modes, flutter echo, etc, but if one has an honest expectation of the space and capabilities of pro-sumer recording equipment, a great recording can still be made. Just do not expect the recording to sound like it was done at Blackbird Studios or Ocean Way. That's just not going to happen. 


If you are a home recordist reading this, I'm not raining on anyone's parade. I'm not bummed that it won't sound like it was done in a legendary studio. Half the charm of recording at home is the sounds you can get at home, and only at home. And once a room is figured out: where to place instruments/performers and microphones, you can maximize the space the best you can. Great recording are to be made! Anyway, this is quite a digression. I just want every home recordist to be stoked about what they are doing.


So basically what I wanted to say was this:


-My band is called The Short Term Melody, if you didn't know that already.
-We're recording a new album called "Roadwaves."
-We're recording it ourselves, at home.
-It's going to sound great.
-My ears are totally ringing right now. I will now sit in silence for the rest of the evening. 

Thursday, September 29, 2011

The Short Term Melody at Golden West College

For the first time in one year, The Short Term Melody played live. Too much time had passed since we did so, but it might have been for the better. All of us had time to grow musically and since the beginning of the summer, had been rehearsing frequently and regularly, all things which benefitted our performance. 

We played at a welcome back even at Golden West College, a community college in Huntington Beach. We had a great time and everyone that was there to watch seemed to have a good time too. Someone in the crowd repeatedly requested for use to play a song by Iron Maiden. 

"Maiden! Maiden! MAIDEN!' That's what we heard from the stage. Unfortunately we could not fill his request. Who can sing like Bruce Dickinson? I hope the onlooker wasn't to upset; Iron Maiden's shoes are just too big to fill. 


What made this gig really is cool is that some of our friends, some of whom we haven't seen in a while came out. Our friend Tom, an aspiring film maker also came out with his friend Alex to film the show. I'd love to see this footage... Tom. haha. 


Someone was so kind enough to write about our performance in their blog, This Is A Good Song. It's a great blog that has opened my eyes a good song or two. We send to you many, many, many thanks!

Here are some pictures from the show. Photographs courtesy of Melissa.
"They sound okay, huh?"
Mike and Alec; too cool for school.
Alec.
Mike.

Allen. (me!)

Monday, August 29, 2011

My new Fender Jazzmaster!

Last Thursday was a great day in the life and times of Allen Morris... that's me in case you were wondering. I finally bought a Fender Jazzmaster! The guitar was sold to me by a good soul on craigslist. I've been dreaming of owning a JM for quite some time, and now it's finally mine!

This particular Jazzmaster is a made in Japan model ("Crafted in Japan" for all those Fender afficionados), and appears to be emulating an early 60's style JM with the tortoise shell pickguard, a 7.25" radius fretboard, thicker neck profile, and all the normal JM fittings: two wide single coil pickups, switchable rhythm/lead circuits with volume and tone controls for each, three-way pickup selector switch, and floating vibrato. 

The guitar however had several modifications. The bridge was replaced by a Mustang bridge (a common mod to Jaguars and Jazzmasters) to keep the strings from skipping out of the saddles. A tension bar, called a "Buzz Stop" was also added to increase downward force onto the bridge. This addition in my opinion affects the guitar tone significantly, making the signature plunky attack of the Jazzmaster more subtle, and significantly increasing sustain. I personally like the addition because it makes the guitar a little more versatile and adds a more fluid, singing quality to leads. The attack is still there though, so don't worry, it sounds nothing like a Stratocaster (also because of the huge pickups).

The Rhythm/Lead Circuits
One of the neatest features of this guitar is the dual circuit design. This concept is similar, though not the same as guitars like the Gibson Les Paul or SG that have volume and tone controls per pickup. On the Jazzmaster, the two circuits are actually voiced differently as they run through different value components. 

The rhythm circuit is activated with the switch "up," and only uses the neck pickup; the pickup selector is made inoperable when in the rhythm circuit. The sounds is darker and mellower than the lead circuit, even with the volume and tone wide open. The idea behind this was to create a smoother, subdued jazz tone, which this guitar excels at. On clean, the guitar easily gets that cool, small club jazz sound. When overdriven, this setting is very fluid, sustaining, warm and fuzzy; fuzzy like a wool blanket I'd like to say. 

The lead circuit activates the 3 position pickup selector: neck, middle (pickup blend) and bridge pickups. This circuit is significantly brighter, though can be made dark like the rhythm circuit by rolling down the tone control. Most players use the lead circuit for this reason, though I personally have found it great to be able to switch from a warm jazz tone on the rhythm circuit, to a glassy surf tone on the lead; or a jangly tone for playing chords on the lead,  to a fuzzed out mess for solos on the rhythm. The possibilities are endless!!!

Floating Vibrato
Another cool feature of the Jazzmaster (also found on the Jaguar) is the "floating" vibrato. It is floating because internal springs counter the pull of the guitar strings, making it possible to up and down bend using the whammy bar. The action of the whammy is very smooth, making those surfy warbling sounds easy. The range of motion is much smaller than that of the Synchronized Tremelo bridge of the Stratocaster; this thing is not made for wild dive bombing! But for accenting, this bridge has no parallel.

Conclusion
Well I'm sure you all know what I think about this guitar. I LOVE IT! The Jazzmaster is a versatile guitar that has lots of tonal options at your fingertips. It may not be the most straightforward guitars out there, but it agrees with the way that I play and my style. It is also worth mentioning that it's one of the most ergonomic and balanced guitars I've ever played, very comfortable both sitting and standing. Now I know why the Jazzmaster has such a respected following. I'm very proud to own this guitar!

Photo Gallery
The new addition to the family: CIJ Fender Jazzmaster. Note the addition of the Buzz-Stop.
Jazzmaster in case.
Headstock detail, with 1960's logo styling and decals.
Famous Jazzmaster players
Bilinda Butcher, Kevin Shields (My Bloody Valentine)
Nels Cline
Elvis Costello
John Davis (Superdrag)
Mike Einziger (Incubus)
Kim Gordon, Thurston Moore, Lee Ronaldo (Sonic Youth)
Ira Kaplan (Yo La Tengo)
Stephen Malkmus (Pavement)
Jeff Tweedy (Wilco)
Tom Verlaine (Television)

Wednesday, May 25, 2011

"Roadwaves" Pre-Production


Since my recent graduation, I haven't skipped a beat and dove headlong into getting ready for the recording of a new album with my band, The Short Term Melody. The album project, dubbed "Roadwaves" by The Short Term Melody's bassist, Alec Giel, has been waiting in the wings for more than a year. We've attempted to record this album twice, but extenuating circumstances have always got in the way.

So third time's the charm, right?

Anyway, for the past two days, I've been doing non-stop pre-production recordings, "scratch" recordings per se, in order to establish song arrangement as well as play with guitar and vocal parts, and of course, experiment with mic placement. Once I am finished with these scratch recordings, I will hand them off to Alec and Mike so they can brainstorm parts on their respective instruments. I have never done things this way before, but I hope that in doing so, will allow Mike and Alec more ample time to think of what they might want to contribute.

So this week I've been making good progress, and hopefully by Monday next week, I will have all the scratch guitar and vocal takes recorded.

I have also been in the process of designing a website for the band, which will hopefully be launching sometime in June. The website will be the official hub for all things Short Term Melody, and once the site is launched, I will be periodically be posting sound clips of our album progress. Stay tuned for more news!

Thursday, May 19, 2011

ART Pro VLA II Compressor Review.

ART Pro VLA II Leveling Amplifier and M-Audio Fast Track 8R.

Today was a joyous day in my little world. A little box (actually it was a pretty big box, and quite heavy at that) arrived at my door this morning from our friends over at Sweetwater.com.

The ART Pro VLA II Leveling Amplifier is a rather inexpensive tube driven two-channel compressor/limiter. Vacuum tubes are all the rage lately, (when I say lately, meaning the past decade or so) and nearly every professional audio company seems to be cashing in on the craze. The audio recording world has been no exception. Many feel that digital recording sounds "cold" or "sterile," and many companies are adding tubes in the signal chain to add some "warmth" to the sound. Now I’m not completely sure how grounded these claims are, being that any quality analog piece of recording equipment, solid state or valve, will have it’s own sonic character. Solid state mic pres, such as ones made by API or Neve, or compressors such as the dbx 160a or the famous UREI 1176 will have plenty of warmth to go around, but we’ll save that discussion for another time.

First Impression
In my little world, the arrival of this ART leveling amplifier is nothing short of a godsend. As a home recordist, I have been using plug-ins for quite some time, but through experience found that working with analogue equipment was more inspiring and easier to get the sounds that I heard in my head. I heard a many good thing about the VLA II and decided to pick one up myself. Unwrapping the unit revealed a quality piece; it had detented pots with well marked descriptors and values, two large analogue VU meters with selectable input/output metering, gain reduction and output level displayed via LED meters, a bypass switch per channel to take the compressor circuit out of the signal chain, XLR and quarter-inch TRS input and output jacks on the back, all housed in a study, stamped metal chassis.
Totally spiking the output meter. Rawr!

The controls, per channel.
Without ado, I connected the VLA II to the I/O of my M-Audio Fast Track 8R interface and began running 2 Track stereo mixes through the unit. My immediate reaction was, “Boy, this thing really colors the sound!” And it does. It rolls a bit of the high end off and even with the Ratio set at 2:1 (the lowest setting) and Input Threshold set to have a gain reduction of only about 1dB to 2dB, compression was quite audible. With a little tweaking of the attack and release times, the compression was tamed and sounded very smooth and pleasing. The overall character however sounded a little too "tubey." Even when I backed off both the input and output gain, I would run into some slight distortion in sound of fizziness on the lead vocal.

Now I’m not completely sure where the sound coloration is taking place, but my guess is that the tubes have something to do with it. Being that this unit is advertised as a "vactrol" type compressor (in other words, a compression circuit that utilizes an optocoupler) chances are the tube itself has little to do with the actual signal attenuation, and more to do with the output gain stage (output level). This however still gives the tube plenty of room to impart it's own sonic character to the overall signal.

Diving In
Opening the unit up revealed the presence of two 12AT7 tubes, one for each channel. 12AT7s are lower gain (but higher current) than the more popular 12AX7 seen in guitar amps. Upon inspection I found the stock tubes to be Ruby Tubes. Being that the VLA II is the only unit I have tried with these tubes installed, I cannot make any reliable judgment on how good these tubes are. Poking around my parts drawer, I luckily found two Tung Sol 12AT7s and quickly popped them in. I love the way Tung Sol tubes have a nice, bright chime in guitar amplifiers, and I hoped that they would sound about the same in the VLA II.
Replacing the stock tubes with any high quality type (in this case a pair of Tung Sol) will help extend the frequency response, increase headroom, and help with overall clarity.
To my luck, they did! I wouldn't go so far as to say it was a "night and day" difference, but much of the higher frequencies that were attenuated with the stock tubes did not occur with the Tung Sols. They were significantly clearer, the bass tighter and more defined, and had much higher headroom... they didn't even distort if I drove the output level very hard (the picture where I'm spiking the output meter). The addition of the Tung Sol tubes really helped the unit out, but I could only imagine that any quality tube from RCA, Phillips, GE, Mullard, or GT would help the output stage immensely. Now don't get me wrong, I'm not knocking the Ruby Tubes at all. I think possibly the VLA II is designed with a lower plate voltage that in turn lowers the headroom, and maybe the Ruby Tubes are less adept to handle such conditions, but that's only a theory.

Concluding Opinion
The ART Pro VLA II as delivered is a good compressor/limiter especially if you want to add a certain vintage character to your recordings. It immediately gave more fatness to the bass frequencies, my guess about 200Hz and below. The only caveat is that some of the high end (especially above 9kHz) I felt was sacrificed, and the mids were not very defined overall. This is not however a criticism of the sound; it is still very useable and with some careful EQ treatments on the front end, will add just enough secret sauce to your mix.

With a higher quality tube replacement, I give the VLA II two big fat thumbs up. None of the high frequency gobbling, much better headroom, more defined mids, and bigger bass without sounding muddy or messy. What was a "character" compressor becomes a solid all around performer good for single sources and 2 Track stereo mixes alike.